Monday, 27 February 2012

DIY Cake/Cupcake Stand

Well, since I need other people to send me pictures of cakes I've done before I can continue I figured I would give you the instructions for making your own cupcake stand.


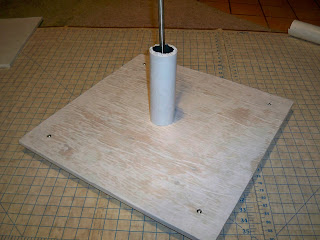
It looks something like this. So, you cut four squares out of plywood. I did a 6", 9", 12" and 16" square.

You also need:
 pvc pipe
 a 3ft 1/2" threaded metal rod. (I suggest using 3/8" though, cause you can find a T nut in this size and not in a half in, at least I couldn't)
 White wrapping paper (I couldn't find any black)
white glue
2 T nuts
newspaper
wooden knobs (4, for feet)

So, first I cut the wood and drilled holes for the metal rob and the screws. Then I cut the pipe into 3 sections of 7 1/2" lengths. (seven and a half inch lengths, not seven half inch lengths. Just to specify. :]) Next I traced all the squares onto the wrapping paper, twice, then added an inch border to half of them. I also drew some rectangles to wrap the pipe in. then I cut them all out. 


If you're using white wrapping paper, make sure you use pencil, or then pen will probably show through.

I mixed the white glue with water and then used a sponge and covered the wood in it. Then I applied the paper to the wood. I used my fondant smoother thingy to smooth out the air bubbles.


Also covered the pipe.

Then I added some feet.

Time to assemble!

So, we need t nuts. For those of you who don't know what T nuts are, they look like this

So, you stick these in the bottom board and the top board. Screw the metal rod into the bottom board. then stick the first pipe on it. Now since the pipe is this thick hollow thing, it'll keep wiggling around. so I made sure mine was centered and then I stuffed it with newspaper to keep it in place. Then you do the same thing with all the rest of the tiers. Screw the top piece on and you're good to go!

Yay! You now have you're very own stand. And it didn't cost upwards of $60. Cause who wants to do that?

So, this is what it looked like with the cake and cupcakes on it, I'll give some more info on the other projects later.


And then I turned it into a pirate ship for a different party.


Enjoy!

It's another Baby Cake

So, my sisters friend had a baby a couple months ago and I was asked to do the cake for the shower. I decided I wanted to do a rubber ducky theme. Turns out that was the perfect idea because the blue I chose for the fondant matched the colour they chose to decorate the shower with, which happened to also have a rubber ducky theme. Although I didn't have any idea who the host was, so we didn't even coordinate it. Funny how things work out eh?


I'm a little rubber ducky, I love my bubbles! Swim swim swim....

Yeah, I may have gone off the deep end. Oh well.

So, this was for little Anakin. The dad's a Star Wars fan, but apparently the mom liked the name anyway, so both parties are happy. He's a cute little baby too.

Anywho, this is a yummy chocolate cake. I believe it had chocolate icing as well, but it's too long ago to remember. 

So, I covered this in blue fondant. Cause water is always depicted as blue. Well, usually it is. Then I molded a rubber ducky out of some yellow fondant and with lollipop sticks I secured him on top of the cake. Then I made some duck silhouettes out of more yellow and put them around the cake.


Then came the time consuming part. Bubbles. I made 3D and 2D bubbles. I arranged a bunch of the 3D bubbles around the ducky. And I did a border of the 2D bubbles around the cake, filling in blue spots with some 3D bubbles. I really like the effect that it had.


Another simple and cute design from the colourful cake princess. (I love being a princess)


Ducky.

Hope you enjoyed this!

Wednesday, 8 February 2012

BABY BOY

I was in Fashion Design once upon a time (before I decided that I didn't want to go into fashion) but while I was there I made some good friends. Over the summer I learned that one of the girls was pregnant. I was so excited, cause really, if anyone would be having a baby, Denise would be the one. She's the only one I knew of in our class who wants to go into children's wear. So It just seemed perfect she was pregnant.

The fashion girls had been seeing my cakes on facebook and get commenting on how they wanted to try my cakes. So when I was invited to Denise's shower, I immediately volunteered to do a cake for her. Chocolate, classic for a group of girls. Did we expect anything less?


Sadly, I forgot to take a picture. So right before they were about to cut into the cake I was like "Crap! I need a picture!" So this is why my picture isn't the best one ever. Although I must admit that my cell phone takes a decent picture.

I didn't have a name to use, cause the baby hadn't been born and I don't think they had chosen a name yet. Once I finished decorating it I had a little mini heart attack wondering if I had remembered correctly about them expecting a boy. But I was pretty sure they had. 

I saw this blog online from another girl who makes cakes and she made this really cool, really tall cake that had these circles that were half attached to the cake and folded over slightly. She used rainbow colours and I thought it looked really cool. I decided to give it a try on this case. So I made a bunch of blue circles and started "gluing" them to the cake. I immediately started regretting this idea. It wasn't like I could just stick it on and move on. I had to sit there and hold it on until it dried enough to hold the weight of the top folding over. I'm an impatient person, so this wasn't working for me. But some were stuck on already so I couldn't even change my mind. 

I forgot to mention this before, I had a wedding to go to the day before the shower. So I was decorating this cake between the wedding and the reception. I didn't have time to wait for these pieces to adhere to the cake. Then I had a stroke of brilliance. If I could find some way to hold them one while I continued on it would be perfect. I finally decided to tie a ribbon around the cake, holding the circles on. It went a whole lot quicker after that. It ended up looking something like this.


Hey, I just realized I do have pictures!

So After the ribbons were taken off it looked like this


That's cool isn't it?

On the top of the cake I went fairly simple. I marbled some blue fondant to roll out and cut the words "Baby boy" out of. And I cut a start out of  some yellow fondant to place the words around.

Lastly, I needed a border around the cake. So I rolled out a cord of fondant. I wanted to make it textured, But I had no tools yet. So instead, I used a jelly bean to make round imprint in the fondant. I'm a genius, I know. XP


My cake was a hit! Everyone loved it. By the time I made it to the dessert table my cake had disappeared. I didn't even get to have a piece. I love easy cakes.

Purple Pengu's

So, My cakes had started getting noticed by people, mainly cause I posted pictures of my works on facebook. So one day I got a message from a girl I knew through people asking me if I would make a birthday cake for her roommate. I said yes of course, cause she was paying me. So the roommate liked purple and penguins. They also wanted an apple cinnamon cake which I thought would pair nicely with my mom's caramel icing.  So, off to work I went. (Hi Ho)


(Side track moment....I really like Cam Giggigigi, whatever his name is, from burlesque. He's lovely. That's what I'm watching as I type. And I'm a little sick so my thoughts drift more easily than normal.) 

So I made up the cake. Because it was a new recipe I had to make one for myself and my husband
. The recipe had to be tasted before it sold, or else what kind of baker would I be? Anyway, can't even remember what recipe I used anymore, I just remember it was really lovely. However I learned after I had made this one that the cake, because it has huge chunks of apple in it, goes really gooey. It also had a lot of air pockets from the apples shrinking. These are not good things for fondant covered cakes. Retrospect is 20/20.

So for the design I made three different shades of purple. I covered it in the light purple and then I used one of my funky shaped cookie cutters from Ikea to make a top for the cake. In the dark purple I stamped swirls and the letter M (for Megan) and then I used gold pearl dust to make them stand out more. I'm not much of a drinker, so I don't have vodka at home o mix the pearl dust with. I do have a bottle of wine I keep for cooking, so I mixed my pearl dust with that. It had the same results. I think.

Then I made a bunch of little purple penguins for the border and in between I did one of those bubble borders I like so much.

So, Now my blog is all caught up with my dA account (Found here). For those who don't know, dA is for deviantART, which is where I post all my fashion work and photo's of my cakes. But I've gotten lazy and haven't updated my cakes in a while. So soon we'll be seeing stuff never seen before by people not on my facebook. I hope this all made sense. See Ya'll!