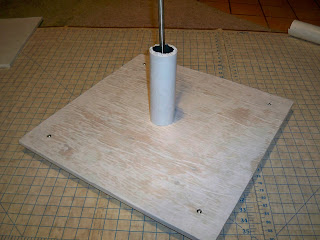
It looks something like this. So, you cut four squares out of plywood. I did a 6", 9", 12" and 16" square.
You also need:
pvc pipe
a 3ft 1/2" threaded metal rod. (I suggest using 3/8" though, cause you can find a T nut in this size and not in a half in, at least I couldn't)
White wrapping paper (I couldn't find any black)
white glue
2 T nuts
newspaper
wooden knobs (4, for feet)
So, first I cut the wood and drilled holes for the metal rob and the screws. Then I cut the pipe into 3 sections of 7 1/2" lengths. (seven and a half inch lengths, not seven half inch lengths. Just to specify. :]) Next I traced all the squares onto the wrapping paper, twice, then added an inch border to half of them. I also drew some rectangles to wrap the pipe in. then I cut them all out.
If you're using white wrapping paper, make sure you use pencil, or then pen will probably show through.
I mixed the white glue with water and then used a sponge and covered the wood in it. Then I applied the paper to the wood. I used my fondant smoother thingy to smooth out the air bubbles.
Also covered the pipe.
Then I added some feet.
Time to assemble!
So, we need t nuts. For those of you who don't know what T nuts are, they look like this
So, you stick these in the bottom board and the top board. Screw the metal rod into the bottom board. then stick the first pipe on it. Now since the pipe is this thick hollow thing, it'll keep wiggling around. so I made sure mine was centered and then I stuffed it with newspaper to keep it in place. Then you do the same thing with all the rest of the tiers. Screw the top piece on and you're good to go!
Yay! You now have you're very own stand. And it didn't cost upwards of $60. Cause who wants to do that?
So, this is what it looked like with the cake and cupcakes on it, I'll give some more info on the other projects later.
And then I turned it into a pirate ship for a different party.
Enjoy!


So approx how many cupcakes does this hold
ReplyDelete