Thursday 14 June 2012

Triple Chocolate Muffins

So I told you yesterday I was trying a new recipe. Oh my goodness! They are amazing. So if you didn't see that post and want to see what I am talking about you can find the recipe Here.

So I quickly made them yesterday before work. I had time to quickly try on e while they were still warm. They're so chocolatey and gooey. Yummy. I came home from work and my husband had eaten three of them. Three of my healthy muffins that I can feel no shame in eating. three of them just gone! Lol. The funny thing is that three of those muffins are probably still less fat, calories and sugars than a Tim Hortons muffin. I can't say much, I had two muffins for breakfast.


These are her version of them. Mine definitely did not turn out this pretty. Ha ha. 

So for those of you who like to have more than just calorie information, this is for you.

She based her calories on 12 large, 24 small. I was going for small, but ended up with medium I guess, so my batch made 18, and this is what my info is based on.

Calories: 77
Carbs: 12g
Fat: 3g
Protein: 3g

Also, tried flavored Greek yogurt yesterday. It is surprisingly tastey. I don't know why I originally thought that the thickness would be gross, because I generally like the thicker yogurts. So Greek yogurt is definitely worth trying. 

Wednesday 13 June 2012

Hi Out There

Sorry I have been awfully quiet lately, but I have had no cakes to blog about! Isn't that sad? So Instead of talking about a cake, I'm just here to catch up.

This will be a short post, as I am currently baking and then I have to go to work in like 45 minutes.

Anyway, lately I have been trying to get into a healthier lifestyle. I've been exercising and eating healthy. And while I still really like my sugar and crave it, I have needed to find some healthier options to satisfy my sweet tooth. I love reading chocolate covered katie (Found Here If you haven't heard of her before) but a lot of her recipes seem to have strange vegan ingredients that I often don't know where to find them. (Like vegan butter. What is that?)

So I have found some other alternatives, and I still plan to try some of her recipes, and I plan to share my experiences with you guys out there. Right now I am working on Triple Chocolate Chunk Muffins (recipe found here) They're supposed to have only 58 calories per muffin. I made mine a little bigger by accident, so mine are really more like 75, but still, that's pretty good for a muffin. I hope they turn out well. I will let you know later.

Friday 30 March 2012

I'm still here.

So, It's hard for me to believe it's only been a month since I have posted on here. It feels like forever ago. It probably feels this way because my last post was a Christmas one, which is months past. I know I don't really need to tell you how long ago Christmas was, but I did anyway.

In any case, I only have a couple cakes left till I'm all caught up and have nothing left to share. I have my aunt and uncles wedding cake to show you, my pirate themed cupcake creation (if I can ever get pictures for it... I asked, but none were sent.)  and my latest cake, which I made wednesday, which is music themed.

So I actually have nothing to show you today, just updating you, letting you know I am still around. (although it seems some drivers have it out for me. My car has been rear ended three times now) And also, there's the fact I'm pretty sure I have no regular readers. If you are out there and you are reading my thoughts, please let me know. I mean I'm normally quite content talking to myself seeing as I do it all the time, but these thoughts were meant to be shared.

So, what's new with me? A whole lot! I've been working a lot on individual desserts and stuff. Muffin cup sized treats. You know, to attempt to control sweet intake. However, that doesn't work when husband eats more than one portion at a time, so I'll just have to try to make them as healthy as possible. The last thing I made was nutella no bake cheesecake. It was actually pretty good. Today I'm just trying to clean up the chaos that was left over from my cake fiasco on Wednesday. Thursdays I work all day, so I didn't get to do it then, so my apartment is horrid right now.

So I should probably wrap this up soon.

On another note, I have decided to go back into fashion design. So I have been working on a lot of things on that front. So If you are interested in what I have been doing on that front you can check out my deviant art here: Here. <3 I think I even update my journal a little more often than my blog.

I'll post again real soon, okay? Okay!

Thursday 1 March 2012

Christmas Time is here!

Vroooom vroooooom vrooooooom.

Yeah, my husband is playing video games and I make car noises as he races. Whats it to ya?

However, this cake has nothing to do with cars, so Onward my fellow readers! -warp-


I apologize for the weirdness tonight, I don't really know what's wrong with me. So, as you know, a couple months ago it was Christmas! Fantastic right? I hope yours was good. Mine was excellent. Busy, but good. In my family it has become tradition (tradition) to make a birthday cake for Jesus. Since I have become the family cake artist, it was my turn to make it. Now more simple pan cakes with "Happy Birthday Jesus" piped on. Oh no. 

Once again I made a chocolate cake. But for some reason this time i didn't feel my normal cake would cut it. So I made the cake and instead of using icing to hold the layers together I decided I would use fudge. Thick gooey, great-grandma's recipe fudge. this stuff is superb. So I had the cake in a springform pan, then I poured the fudge in and added the top layer of cake. Then it needed time to cool.


Mmmmmm Fudge. Seriously, fudge instead of icing just makes the cake so decadent. And then to make matters worse I iced it so that the fondant would stick. This cake would send anyone into a sugar coma.

As for the decorating, It was a little un-cohesive. (what is the opposite of cohesive? Hmmm.) I wanted to do a regular christmasy theme around the side of the cake. So I cut out Christmas trees and presents. then I painted them all with food colouring. This didn't turn out as nice as I would have liked. 


The figurines on top are an old nativity set that I used to play with as a child. Considering I was making the cake on christmas eve, before two family get togethers and an evening church service, I didn't have time for a complex cake. So I set up the nativity and then used a garlic press to make hay. I added a little banners to serve as a stable of sorts and had it saying Happy Birthday Jesus! I thought it was brilliantly thought out. 


Look at the cute little holy family. 

Enjoy!

Monday 27 February 2012

DIY Cake/Cupcake Stand

Well, since I need other people to send me pictures of cakes I've done before I can continue I figured I would give you the instructions for making your own cupcake stand.


It looks something like this. So, you cut four squares out of plywood. I did a 6", 9", 12" and 16" square.

You also need:
 pvc pipe
 a 3ft 1/2" threaded metal rod. (I suggest using 3/8" though, cause you can find a T nut in this size and not in a half in, at least I couldn't)
 White wrapping paper (I couldn't find any black)
white glue
2 T nuts
newspaper
wooden knobs (4, for feet)

So, first I cut the wood and drilled holes for the metal rob and the screws. Then I cut the pipe into 3 sections of 7 1/2" lengths. (seven and a half inch lengths, not seven half inch lengths. Just to specify. :]) Next I traced all the squares onto the wrapping paper, twice, then added an inch border to half of them. I also drew some rectangles to wrap the pipe in. then I cut them all out. 


If you're using white wrapping paper, make sure you use pencil, or then pen will probably show through.

I mixed the white glue with water and then used a sponge and covered the wood in it. Then I applied the paper to the wood. I used my fondant smoother thingy to smooth out the air bubbles.


Also covered the pipe.

Then I added some feet.

Time to assemble!

So, we need t nuts. For those of you who don't know what T nuts are, they look like this

So, you stick these in the bottom board and the top board. Screw the metal rod into the bottom board. then stick the first pipe on it. Now since the pipe is this thick hollow thing, it'll keep wiggling around. so I made sure mine was centered and then I stuffed it with newspaper to keep it in place. Then you do the same thing with all the rest of the tiers. Screw the top piece on and you're good to go!

Yay! You now have you're very own stand. And it didn't cost upwards of $60. Cause who wants to do that?

So, this is what it looked like with the cake and cupcakes on it, I'll give some more info on the other projects later.


And then I turned it into a pirate ship for a different party.


Enjoy!

It's another Baby Cake

So, my sisters friend had a baby a couple months ago and I was asked to do the cake for the shower. I decided I wanted to do a rubber ducky theme. Turns out that was the perfect idea because the blue I chose for the fondant matched the colour they chose to decorate the shower with, which happened to also have a rubber ducky theme. Although I didn't have any idea who the host was, so we didn't even coordinate it. Funny how things work out eh?


I'm a little rubber ducky, I love my bubbles! Swim swim swim....

Yeah, I may have gone off the deep end. Oh well.

So, this was for little Anakin. The dad's a Star Wars fan, but apparently the mom liked the name anyway, so both parties are happy. He's a cute little baby too.

Anywho, this is a yummy chocolate cake. I believe it had chocolate icing as well, but it's too long ago to remember. 

So, I covered this in blue fondant. Cause water is always depicted as blue. Well, usually it is. Then I molded a rubber ducky out of some yellow fondant and with lollipop sticks I secured him on top of the cake. Then I made some duck silhouettes out of more yellow and put them around the cake.


Then came the time consuming part. Bubbles. I made 3D and 2D bubbles. I arranged a bunch of the 3D bubbles around the ducky. And I did a border of the 2D bubbles around the cake, filling in blue spots with some 3D bubbles. I really like the effect that it had.


Another simple and cute design from the colourful cake princess. (I love being a princess)


Ducky.

Hope you enjoyed this!

Wednesday 8 February 2012

BABY BOY

I was in Fashion Design once upon a time (before I decided that I didn't want to go into fashion) but while I was there I made some good friends. Over the summer I learned that one of the girls was pregnant. I was so excited, cause really, if anyone would be having a baby, Denise would be the one. She's the only one I knew of in our class who wants to go into children's wear. So It just seemed perfect she was pregnant.

The fashion girls had been seeing my cakes on facebook and get commenting on how they wanted to try my cakes. So when I was invited to Denise's shower, I immediately volunteered to do a cake for her. Chocolate, classic for a group of girls. Did we expect anything less?


Sadly, I forgot to take a picture. So right before they were about to cut into the cake I was like "Crap! I need a picture!" So this is why my picture isn't the best one ever. Although I must admit that my cell phone takes a decent picture.

I didn't have a name to use, cause the baby hadn't been born and I don't think they had chosen a name yet. Once I finished decorating it I had a little mini heart attack wondering if I had remembered correctly about them expecting a boy. But I was pretty sure they had. 

I saw this blog online from another girl who makes cakes and she made this really cool, really tall cake that had these circles that were half attached to the cake and folded over slightly. She used rainbow colours and I thought it looked really cool. I decided to give it a try on this case. So I made a bunch of blue circles and started "gluing" them to the cake. I immediately started regretting this idea. It wasn't like I could just stick it on and move on. I had to sit there and hold it on until it dried enough to hold the weight of the top folding over. I'm an impatient person, so this wasn't working for me. But some were stuck on already so I couldn't even change my mind. 

I forgot to mention this before, I had a wedding to go to the day before the shower. So I was decorating this cake between the wedding and the reception. I didn't have time to wait for these pieces to adhere to the cake. Then I had a stroke of brilliance. If I could find some way to hold them one while I continued on it would be perfect. I finally decided to tie a ribbon around the cake, holding the circles on. It went a whole lot quicker after that. It ended up looking something like this.


Hey, I just realized I do have pictures!

So After the ribbons were taken off it looked like this


That's cool isn't it?

On the top of the cake I went fairly simple. I marbled some blue fondant to roll out and cut the words "Baby boy" out of. And I cut a start out of  some yellow fondant to place the words around.

Lastly, I needed a border around the cake. So I rolled out a cord of fondant. I wanted to make it textured, But I had no tools yet. So instead, I used a jelly bean to make round imprint in the fondant. I'm a genius, I know. XP


My cake was a hit! Everyone loved it. By the time I made it to the dessert table my cake had disappeared. I didn't even get to have a piece. I love easy cakes.

Purple Pengu's

So, My cakes had started getting noticed by people, mainly cause I posted pictures of my works on facebook. So one day I got a message from a girl I knew through people asking me if I would make a birthday cake for her roommate. I said yes of course, cause she was paying me. So the roommate liked purple and penguins. They also wanted an apple cinnamon cake which I thought would pair nicely with my mom's caramel icing.  So, off to work I went. (Hi Ho)


(Side track moment....I really like Cam Giggigigi, whatever his name is, from burlesque. He's lovely. That's what I'm watching as I type. And I'm a little sick so my thoughts drift more easily than normal.) 

So I made up the cake. Because it was a new recipe I had to make one for myself and my husband
. The recipe had to be tasted before it sold, or else what kind of baker would I be? Anyway, can't even remember what recipe I used anymore, I just remember it was really lovely. However I learned after I had made this one that the cake, because it has huge chunks of apple in it, goes really gooey. It also had a lot of air pockets from the apples shrinking. These are not good things for fondant covered cakes. Retrospect is 20/20.

So for the design I made three different shades of purple. I covered it in the light purple and then I used one of my funky shaped cookie cutters from Ikea to make a top for the cake. In the dark purple I stamped swirls and the letter M (for Megan) and then I used gold pearl dust to make them stand out more. I'm not much of a drinker, so I don't have vodka at home o mix the pearl dust with. I do have a bottle of wine I keep for cooking, so I mixed my pearl dust with that. It had the same results. I think.

Then I made a bunch of little purple penguins for the border and in between I did one of those bubble borders I like so much.

So, Now my blog is all caught up with my dA account (Found here). For those who don't know, dA is for deviantART, which is where I post all my fashion work and photo's of my cakes. But I've gotten lazy and haven't updated my cakes in a while. So soon we'll be seeing stuff never seen before by people not on my facebook. I hope this all made sense. See Ya'll!

Thursday 19 January 2012

I made me some homemade truffles.

So, as you may have noticed I really like chocolate. But I'm attempting to eat healthy and chocolate doesn't always jive with that. Well, not in the amounts that I like to eat it. But it's just so irresistible! Seriously....

In any case, I have this taste of home magazine I've been getting some healthier food options from, the Comfort food diet Cookbook. I love it, it's awesome.

Well, there's a chocolate truffle recipes in it, A light version. And I thought, Hey, Why not? So I got out my new Kitchenaid mixer and went to work.


The texture of these things are ammmmmazing. I was so surprised. They turned out to be a little addicting. Very Delicious. 

So, you probably want the recipe right? Ok, I'll Share. Here it is.

Light Chocolate Truffles

1/3c semi-sweet chocolate chips.
125 g reduced fat cream cheese (this is half a regular package of cream cheese, 4 oz if you're american.)
1/3c cocoa
1-1/4c powdered sugar

Coating
2 Tbsp cocoa
2 Tbsp powdered sugar

These are really easy to make, but I warn you, I found it really messy. But is it such a problem to get covered in chocolate? I don't really think so.

1. Melt the chocolate chips.

2 In a small bowl, whip the cream cheese until fluffy. Add the cocoa  and melted chocolate, continue mixing. Slowly mix in the powdered sugar.

3. In a separate bowl, mix the extra cocoa and icing sugar. 

4. When all is mixed, form the chocolate into 1" chocolate balls. I suggest dusting your hands in icing sugar first, but I found it only really helped while rolling the first truffle. Roll the truffle through the cocoa and icing sugar mix.

5. Refrigerate for a least a hour to harden the balls.


Each truffle is 62 calories and 2g of fat. So not too bad for chocolate truffles.

I hope you enjoy and don't get too addicted to these treats!

Sunday 15 January 2012

Grandma's getting how old?

So this past September my Grandma turned 70. She really doesn't look it, but I'm told she is. Which makes sense I suppose, considering my sister and I are both in our 20's. In any case, 70 is a big birthday, so we had a big party to celebrate with lots of family and friends. My sisters backyard was full.  The nice thing about these family parties when I have to deliver a cake is location. My sister lives four houses down the street from me, so I just have to walk the cake down the street. Easy, fast and very convenient. (especially when I run out of baking supplies)

Back to Grandma. My Grandma loves the colours purple and blue. She also loves tropical things; Hawaii, dolphins, torpical flowers, palm trees, etc.. I wanted to use some of the things she loves but I didn't want the cake to be too busy. So I made a two tier cake. The bottom layer was chocolate. Surprise! The top layer was tropical. It had pineapple and mandarin oranges in it.


So, I covered both of my tiers in fondant and stuck them on their cake boards. So the bottom cake could support the top cake I put candy sticks in and cut them level to the cake. I know they aren't the best option because they absorb moisture and end to unravel once they do, but I knew they were safe to have in food and they are what I had around. And they're easy to cut compared to wooden dowels. With the sicks in place I could then stack the next layer on top on the purple tier. I added a blue fondant ribbon along the bottom of the first tier. On the second tier I needed to cover the cake board, so I added a border of balls of fondant that alternated in size. 

I decided the cake was lacking in anything exciting, so I thought I would try doing flowers. Not knowing how to do flowers and not even having the right tools, they turned out fairly well.


I made a purple and an Orange hibiscus flower. I cut out the basic shape using a knife, then I made the texture on the petals using the handle of a paintbrush. The handle actually worked better than expected. I now have the proper tools for making flowers, as you'll see in upcoming blog posts. (You'll also see me use a jelly bean for imprints on a border later on as well. I use what I can find) I also made an orange bird of paradise flower. In the end I LOVED the orange colour I chose to use. It made the cake more bold and gave it some interest.

Once again a fairly simple design, But because it was my first time doing more than one tier and my first time  making flowers I didn't want to bite off more than I could chew.


Grandma loved it, which is really all that matters. The guests thought it was yummy, and the woman of my family LOVED the tropical fruity layer. For some reason the woman of my family really like the tropical stuff. In the end it was too much cake. I tried sending it home with as many people as I could. We even sent some home with some woman who had just moved into the neighborhood. 

Funny story, The party was in my sisters backyard and the gate had been left open. All of a sudden this dog appeared in the party. Shortly after the dogs owner appeared to get it back. They had been out for a walk and the dog had run off to where all the people were. So my family, being overly friendly, started talking to this woman and found out she had just moved in around the corner with This was at the point where I was trying to get as much cake gone as possible. So I offered her some. She seemed reluctant at first, but after my family also offering she said she would come back after her walk with the dog to pick some up. Sure enough, she came back and there was yet another piece of the cake GONE. I love not having too many leftovers at home. I don't know why, I just have an aversion to leftovers.

It's time for Tea!

After my nieces birthday party one of my sisters friends asked me if I would be interested in making a cake for her daughter, she even said she would pay me. I was right on board for that because up until now I had never been paid to make a cake for anyone.

The little girl was having a pink and purple tea party themed birthday. I was originally thinking I would do a cake cut into the shape of a teapot. Like if you were looking from the top it would look like a teapot. Then I decided that just wasn't good enough. I was going to make a tea pot with cups and milk and sugar. The whole shebang.


This may come as a shock if you've been reading my other posts, but this cake is NOT chocolate. Since the little girl liked pink so much I decided to use the strawberry cake recipe I had used for my nieces birthday. So, I made the cake and then let it chill. Then i carved the cake to make it rounded like a teapot. In retrospect I wish I had made it more round cause this reminds me more of a kettle than a girly teapot. 

So once I had the shape I iced it in vanilla and set it aside. For the details, I used rice crispy treats and formed them into a spout, a handle and some cups. In the end I only ended up using one cup on the tray.

After the rice crispy treats had set I iced them and then left them to harden some more. Going back to the cake I covered it in a layer of purple fondant. the spout and handle were covered in pink fondant. On top of the cake I added a pink circle of fondant on it with a pink ball of fondant secured with a tooth pick on top of that. This was to create the look of the lid. Then I secured the spout and handle onto the cake using tooth picks.

Next it was time to prepare the board. I used a rectangular cake board to act as the tea tray. Then I cut out a large white circle to act as a doily for under the tea pot. With the circle in place on the board I Traced a smaller circle inside and then traced a lattice pattern inside the second circle. Next I put the teapot on top of the fondant doily and arranged the cup beside it.


Then I added some last minute decorations to pull it all together. I added a bow around the ball of the handle and a simple border of rolled purple fondant along the bottom of the pot. Then it was time to pipe.

This was my first time doing a lot of decorative piping on a cake. I must say, I did a decent job of it. On the pink I chose to do a swirly design in white. I love doing swirls. Then the purple got a white and pink floral design. To finish it all off I used pink icing to decorate the design I had traced into the white doily. 

When the parents came to pick up the cake they loved it. They called it a cake boss cake, which was the biggest compliment I could have gotten. I know my cakes are nowhere near that, but it was still nice to see the parents so happy with it.

Musical Cupcakes.

I am part of a local concert band and for our one concert they asked some of us to make some yummy desserts for intermission. I decided I would volunteer myself for this.


Once again, chocolate cupcakes. Really, is there any other flavour to have? These ones I covered in a white fondant again. I don't have any musical cookie cutters, but I am still on the lookout for them. Instead I traced these out with a knife. I did an eighth note (yellow), a fermata (pink), the base clef (purple), and the eighth rest (orange).

This was really quick, simple and easy, which is quite the opposite of my normal plans for a project. Everyone there loved them so I had no leftovers to take home, which is just how I like it.

Monday 9 January 2012

Back to present day

For Christmas I got Andrew a new tool box. Since I got a bunch of new baking tools for Christmas and my kitchen already has no room, I asked Andrew to bring me his old, small tool box home for me to use for my baking tools. It's one of those classy red ones, which doesn't exactly go with my kitchen. So I'm gonna take it to work with me (a truck wash) where I can paint it and really girl it up. I'm thinking a white colour or a really pale pink, with some cute wrapping paper to line the drawer bottoms. Then I think I will replace the broken door with some cute fabric curtains.  I think it will be uber cute, I'm kind of excited for it. And I'm excited to have a place to keep all my stuff. And the new stuff I intend to buy.

Sunday 8 January 2012

Happy Number One Taydee Baby!


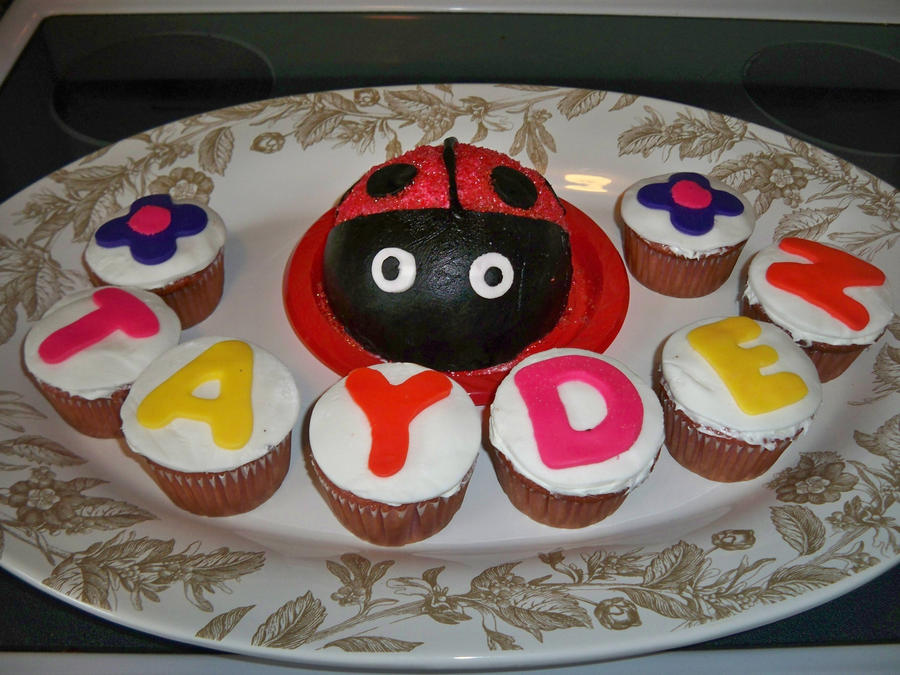
My Niece turned one in April. Her name is tayden and her nickname is taydeebug. We were doing a ladybug themed birthday party for her first. My sister decided she wanted to do a combined birthday with the kids, the friends and the family.

It is tradition in our family to make a red cake for the kids first birthday party. I looked into making a red velvet cake for her, but when I saw how much food colouring in it I knew I wasn't doing that. I have an aunt and a mother who both talk about how bad red food colouring (among other things like aspetame) So I have this little voice in the back of my head telling me not to use red food colouring. At least not a lot of it. So I had to find an alternative.

Pink! It's close to red, it's colourful and there are so many fruits that I can  get the colour from. I decided to make a strawberry cake for her. This time it wasn't completely from scratch. Vanilla cake mix, strawberry jello mix and a container of pureed strawberries. It was delicious and such a lovely shade of pink. I used plain vanilla icing on it.

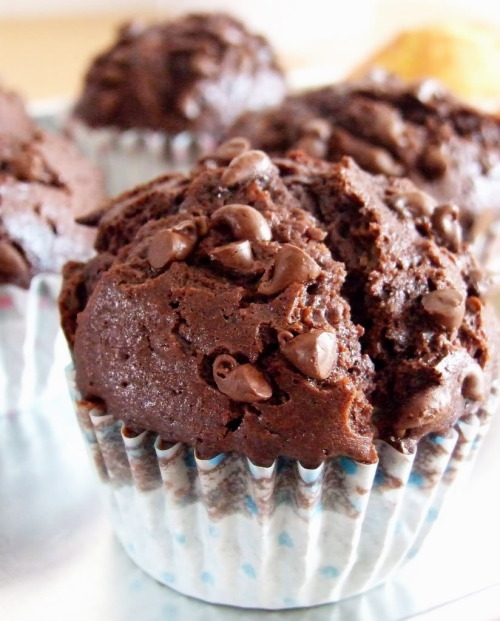
So I made a little individual cake for the niece which I carved into a round ladybug shape. the rest of the batter was used for cupcakes for the chillens. (and by chillens I mean children)

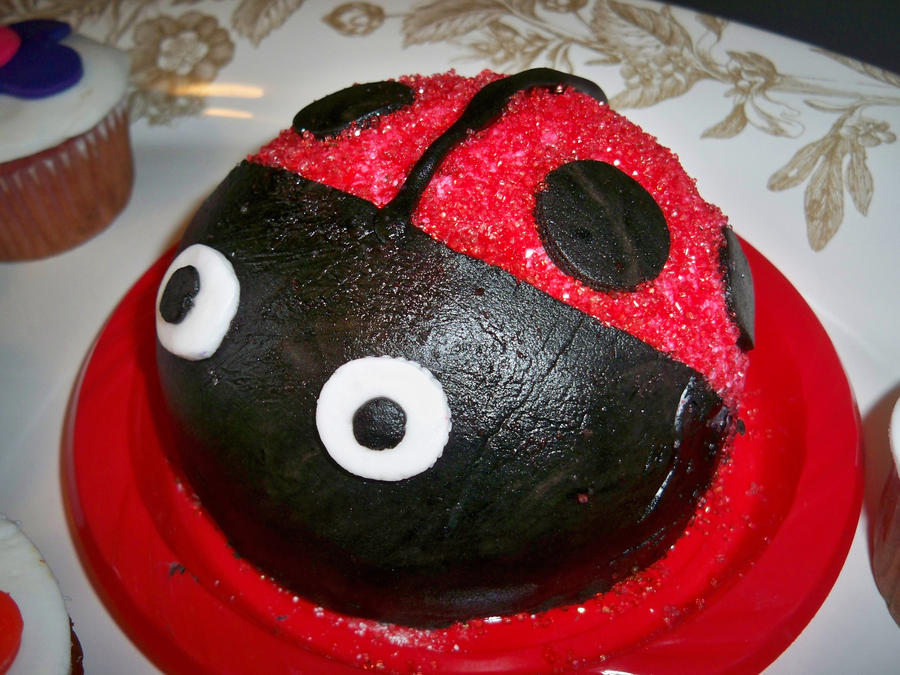
Once I had the round mini cake shaped, I iced it in vanilla. I know I said earlier that I have a thing about dyes, but I made black fondant for the ladybug. I made the head and the striped down the middle as well as some spots. Then I took red course sugar and filled in all the space around the black. That's what you give to one year old right? Course red sugar? Hey, I'm not the one who has to stay and watch her and put her to bed. I'm just aiming to be the favorite aunt. :]


Next it was time to ice and decorate the cupcakes. I went easy with then. Covered them is white fondant, spell the childs name and bookend it with flowers. Lucky for me there were 8 kids. And her name is six lettered and two flowers, it was so perfect!

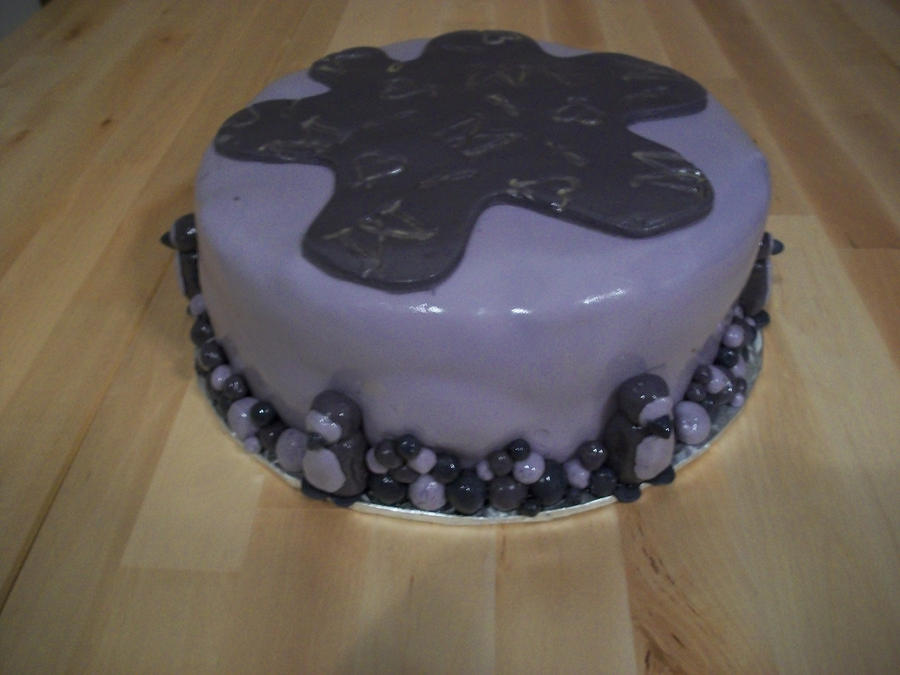
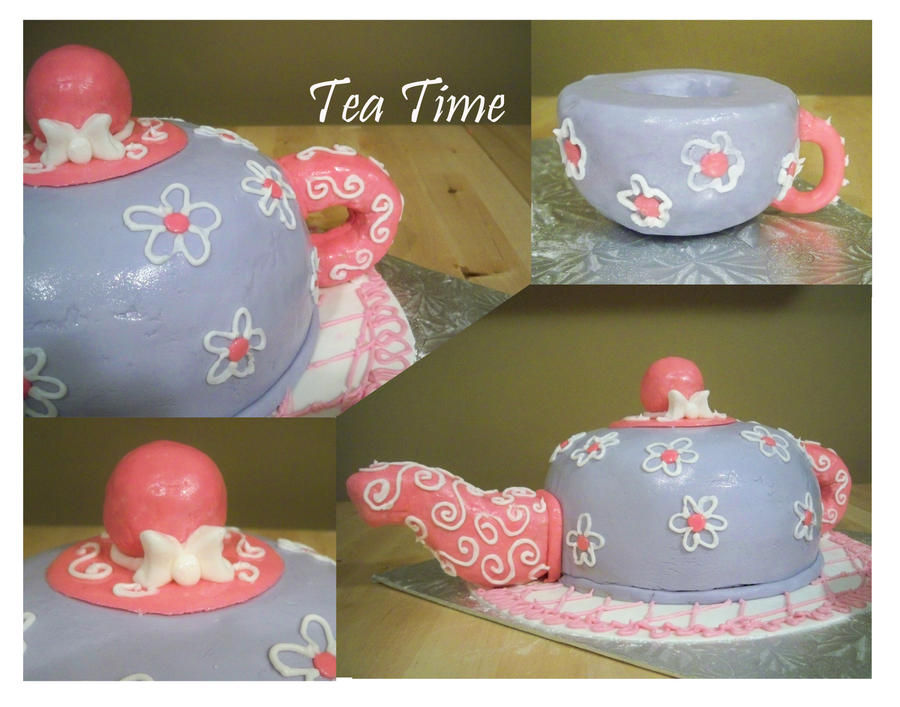
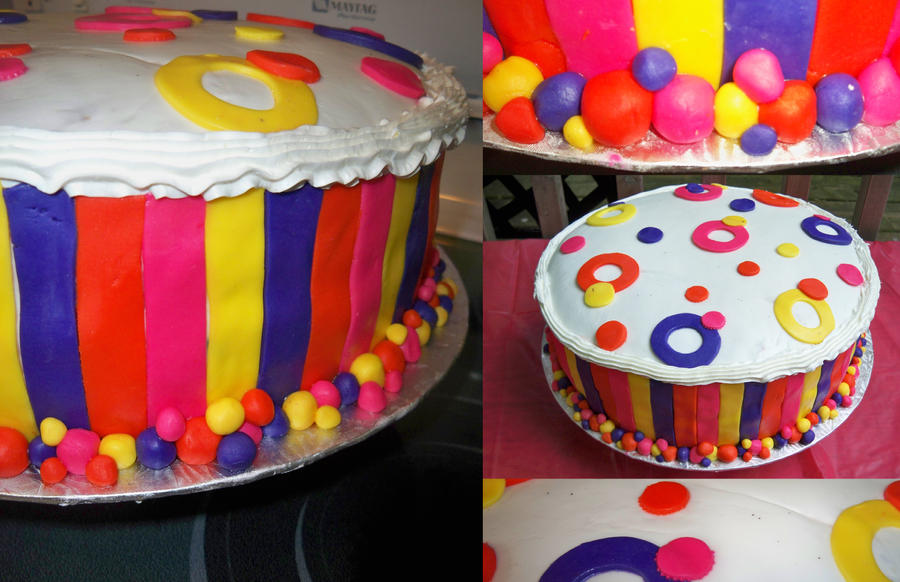
I bet you thought I was done. But like I said, It was combined, children family and friends. I needed a cake. A massive, yummy, pretty cake! I dubbed it the circus tent.


It was chocolate, of course. And more chocolate icing! Adults like chocolate, we like it a lot. I wanted bold and colourful for this cake. I covered the whole thing in white fondant and then added one inch stripes all up the side. on top I didn't want to just do normal, boring polka dots like on my last cakes. So I cut out a bunch of different colours, sizes and styles. O's as well as solid circles. Wow, creative.

I'll admit, I am terrible at Leveling a cake. So, my stripes didn't all line up nicely with the top of the cake. I was going to do a nice clean edge of piping around the top but I was working on the border, I was running out of time and I was freaking out. My husband, who was already helping me roll out balls for the border, was all like 'I do caulking for work when I do windshields, I can do the piping!' I was thinking that sounded reasonable. Until he did it, and it wasn't neat. At all. I love him to bits, but don't believe your husband when he says he can do the piping on he cake. Windshields aren't caked. they don't need to be perfectly straight and you're not working in a circle. But it was good enough.

So, one day I saw a border on a cake that was a bunch of little balls going around and up the cake instead of just a single line. So That is what I decided to do. It became my new favorite border. you'll probably see it a lot on upcoming cakes.

Engagement Desserts


So, I got married on January 1, 2011 and I kindly had one of my friends offer to do my hair for the wedding. A couple months later she was engaged and I thought I would thank her by making some pretty desserts for her engagement party. I found out from one of her bridesmaids that her colours were coral, brown and gold.

For the cake I did vanilla with vanilla icing. Then I covered it in the left over brown fondant from the M&M's cake. Then I made some coral polka dots and a coral ball on top that I dusted in gold pearl dust to make them shimmery. I finished it off with a border of brown and coral balls, also dusted with the gold pearl dust. I haven't gotten very adventurous yet.

(I apologize for the lack of pictures. I was never intending to make a blog. I didn't know I would end up making so many cakes and I don't find my writing interesting to read.)

For the cupcakes I used pretty gold wrappers because I don't have any of that shiny pretty colour on the cake. My Yummy chocolate cupcakes, I actually use this recipe for all my chocolate cake purposes. It was the first on I ever tried and it's been perfect every time. Well, every time I follow the recipe and include all of the ingredients. By this point I almost have the thing memorized.

I'm not very good with icing. Still to this day. Almost every time I try to make icing it fails badly. It's not that it tastes bad, I just can get it stiff enough to hold it's shape. Which on things like cupcakes I find very important. I tried making icing flowers on cupcakes I made one time, but by the time I was finished with them the flowers were sliding off the cupcakes and looking less and less like flowers as they went. So I like to stick with premade icing in a container. I feel so ashamed of the fact sometimes. But, I think success in my decorating is more important overall than the fact that my icing is not homemade. Maybe someday I'll figure it out.

Anyway, I made these chocolate cupcakes and used yummy better crocker chocolate icing. Piping icing like that onto 2 dozen cupcakes take a looooot of icing. I think I went through 3 cans of the stuff. Then I felt they looked boring. So I booked it down to the local Bulk Barn (the party was in an hour) and hoped to find coral sprinkles. Which I didn't. So I mixed pink and orange course sugar. Which in the end I liked a lot, it looked really pretty. I also added some extra sugar around the edge of the cake to tie them together.

Turns out it was a party where most people decided 'hey, I'll whip up a dessert for tonight!' so I ended up bringing home almost the whole cake and at least a dozen cupcakes, which I desperately tried to give out to family and friends because I did not need that much baking in my house. Which is generally the way my baking projects go. Apparently my goal is to make everyone I know fat with my decadent baking. Better than just me getting it all right? At least I am spreading the love.

M&M's Freak

So, I have an older sister. Her birthday is in February and she is a huge M&M’s fan. Although fan may be an understatement... In any case, for her birthday she wanted an M&M themed birthday cake.  She showed me various ideas and pictures of other peoples versions of themed cakes.  I decided I would make her cake look like an M&M package. (Man, I am getting really annoyed with writing/typing M&M.)  I also wanted to make the M&M Characters sitting on the cake. This was the end result.


This was a chocolate cake, again make from scratch. Could a cake based on candy coated chocolate be any other flavor? This one just had a plain chocolate icing since big gatherings call for no peanut butter. Again I used the marshmallow fondant, but I modified it a bit this time. I come from a family where certain people are really natural. They don’t like artificial sweeteners and food colours and other such things. I feel the same way about these things. I believe aspartame is really not good for the body, and neither are the chemicals in food coloring. (mini rant over) But M&M packages are dark brown. The little big of food colouring I would consider using just wouldn’t cut it. So, here is my chocolate marshmallow fondant recipe. (I have since learned I can just use chocolate paste…) Pleaase keep in mind this makes the whole batch of fondant brown.

Chocolate Marshmallow Fondant
4 cups mini marshmallows
3 cups icing sugar (plus some extra for dusting)
1 cup cocoa
2 tbsp water
Food colouring

1.       Put the marshmallows in a microwave safe bowl, add the water and stir so all the marshmallows get damp. Microwave for about 60 seconds. 
2.       Add the cup of cocoa and any additional food colouring (depending on how dark you want the brown) Give the marshmallows a stir.
3.       Keep adding icing sugar until you can’t stir it anymore. For me it’s usually about a cup, or a cup and a half before I dump it out of the bowl.
4.       Dump it onto a surface that is dusted with icing sugar. Start to knead the fondant, adding more icing sugar as needed. Once the fondant is a nice smooth ball it is ready to be used.

So the first step to making the cake is stacking it and icing it. In this case I had to do a bit of carving. I tapered the cake at the end to make it look like M&M’s were spilling out. Once the cake is the shape you want you ice it all. It doesn’t have to be overly neat, but I find the icing can’t be too thick either. This is a chocolate cake with chocolate icing. Also, never forget your baking soda like I did with this one... it ends up kind of dense. But that's what I get for rushing right?

So I iced it and covered it in a plain layer of fondant.  After that I used some of the white fondant to make the tear in the package, which was a long piece of fondant cut straight on one side and jagged on the other. I found a picture of the M&M label on the internet which I zoomed in on and traced it out on tracing paper. I then used that as a template to cut the lettering out of fondant. Then I added the M&M background using mini M&M's. I piped the smaller details with royal icing. Then, using the mini M&M's again, I made bigger M&M's which I piped the M's onto. '

The figurines were made out of rice crispy treats. The blue one was covered in blue fondant and the red one was covered in chocolate. Then I piped their faces on and cut an M out of fondant. The arms and legs were made of some Tropical licorice that I found at the local Bulk Barn. Then I made some shoes out of white fondant.


I must say I was pretty happy with my second try at making a fondant cake. Everyone at the party loved it!

It's my First!

So, it has been said to me that I should start a blog. I make pretty edible things that people think should be shared with the world. So here I am. However, sadly for you people who are sitting there reading what I have to say I have a terrible time putting my thoughts into words. So I hope this isn’t too terrible to read.

Let me start my introducing myself to you lovely people. I am Sam. I’m 21 years old and I have a wonderful husband, he’s sometimes my guinea pig for my experimenting. He doesn’t mind. I’m new to baking; it is a hobby I picked up since I was married. Cake boss inspired me to start attempting fancy cakes and learning to work with fondant.

I’m going to start back at the beginning and work up towards my current projects for you guy. I won’t be touching too much on my first cake, being as it was just simple and quick.

Trust me, my designs get way better and more complex, I promise.


This was back when I was making Marshmallow fondant. I found it worked well, but once I got into bigger projects and was working more frequently I switched to store bought, pre-made fondant. You can find the recipe for Marshmallow fondant here

This was a chocolate cake with peanut butter frosting. It was delightful, but simple. And it was made from scratch. What a good house wife I make right?

Anyway, I hope you enjoyed my little introduction. More good stuff to come soon!